Here is what I have so far. I warn you, this is a bit of a photobomb. If anyone wants a tutorial or has any questions let me know. This is a stay-at-home Mommy photo shoot. The only fancy equipment was my Nikon, but you would be surprised what you could do with even a simple digital camera. I think spent about $50 for the backdrop, the ornaments, basket, outfit, lights, and fuzzy material for the "snow".
Sunday, November 11, 2012
It is almost that time again...
The Christmas season is practically here. I have already started Little Mans Christmas pictures so we could get cards ordered. I say started, because there are so many other ideas I still need to try, some of which require a tree in the background...and it is way to early for a tree in the living room.
Here is what I have so far. I warn you, this is a bit of a photobomb. If anyone wants a tutorial or has any questions let me know. This is a stay-at-home Mommy photo shoot. The only fancy equipment was my Nikon, but you would be surprised what you could do with even a simple digital camera. I think spent about $50 for the backdrop, the ornaments, basket, outfit, lights, and fuzzy material for the "snow".
Sunday, September 16, 2012
Pumpkin Bread Recipe
It's that time of year again! Time for pumpkin spiced lattes, pumpkin candles, pumpkin pie...yeah, I am all kinds of obsessed with pumpkin everything each fall!
I have been baking and cooking up a storm lately. I was trying to find a bread recipe to try out and then decided to try to find a pumpkin bread recipe. I looked at a couple of recipes and formed my own based on what I had in hand. Here is what I came up with and it was delicious! Very moist, with just enough flavor and sweetness. It was awesome with some melted butter...so yum!
Pumpkin Bread Recipe
1 and a 1/2 cups of flour
1/2 teaspoon of salt
1 cup of sugar
1 teaspoon baking soda
1 cup canned pumpkin puree
1/2 cup olive oil(Bertollis Classico)
2 eggs, beaten
1/4 cup water
1/2 teaspoon nutmeg
1/2 teaspoon cinnamon
1/4 teaspoon ground ginger
Directions
1. Preheat oven to 350°F. Mix together the flour, salt, sugar, and baking soda.
2. In a separate bowl, mix the pumpkin, oil, eggs, water, and spices.
3. Combine the dry ingredients with the ingredients you mixed in step 2. Mix until the batter is pretty smooth.
4. Pour into a well-buttered (I used the Pam baking spray) 9x5x3 inch loaf pan. Bake about 50-60 minutes or until a toothpick tested in the center comes out clean. Let it cool down a bit, then remove it from the pan and place on a cooling rack.
We ate ours once it cooled down a bit but was still warm enough to melt the butter.
Hope you guys enjoy and please let me know how yours turns out if you try it!
Labels:
baking,
bread,
dessert,
fall,
front door wreath,
pumpkin bread
Thursday, September 13, 2012
Snoring husbands kind of suck
My husband snores...
And he never actually starts snoring until I finally put my head to the pillow and close my eyes. It doesn't matter if I sit in bed reading for an hour or two, he will be pretty quite until I am ready to sleep. What the heck is up with that?
I used to take my leg and slam it down onto the bed so he would feel the sudden movement and wake up and roll over (which usually ended the snoring). Then there were times when that didn't work and I had to tap him about 20 times on the shoulder and practically shout his name to wake him up. I swear this man could sleep through anything.
We now have a four month old baby in the room with us and I think these boys are ganging up on me already. If I wake my husband up quietly to stop his snoring, the baby wakes up! It's like the sound ends up being his "white noise". So now it is either having an awake baby who decides he wants to play or listening to the loud snoring husband.
*sigh*
I totally need to have a girl next pregnancy to even out this household...since we all know us girls don't snore ;)
Tuesday, September 11, 2012
9-11...11 years later
I don't know where time goes. It is hard to believe that it has been eleven years since the attack. My story of where I was, isn't as exciting as some, but it is something that I will never forget.
I was a freshman in high school. We had just started theatre class a few min before, when the principal came over the intercom. He told the teachers to turn on the news and said that the towers had been attacked. We lived not far from DC, and once everyone realized the pentagon had been hit as well, many people in our school started using their cell phones to try to call their parents. I remember sitting next to my friend Ashlee and she was in shock. She told me her father was at the pentagon. I told her we needed to pray for his safety then. We sat and watched the tv for the rest of the class.
I had English class next, and the news coverage continued. My friend Mike sat in front of me, and was commenting on what terrorist group was responsible. I was called down to the office to be picked up early, not long after class had started. I remember walking down the halls, passing crying students who were frantically still trying to reach family who worked at the Pentagon.
It didn't feel real... I continued Watching the footage on tv and it just didn't feel like it could be happening. I don't think we watched anything else for about a month.
Looking back, I am so glad that our school administration decided to tell us about the attacks and let us watch them on tv. I know it terrified many of the students, especially the ones who didn't know if their family members were hurt or safe at the Pentagon, but we were old enough to know what was happening. I know I would have been upset to go through the school day, blind to the events that were unfolding.
I have been able to visit the towers location about two years after, and we visited the field in Pa several times. The first visit to the field was only a few months after the attacks, and it was amazing to see the homemade memorial that was created by those who visited it. They had a temporary building in place the last time I went, and it didn't have the same impact as what had been created originally. It was still very moving, but they didn't keep everything that had been added over the years.
So, that is my "where I was" story. I will never forget.
Monday, September 10, 2012
It's a candle...With a surprise ring inside!? Whaa?!
I love Pinterest. Good lord, the stuff you can find is just amazing. A few weeks ago, I saw a pin in the products category for Diamond Candles. These candles are soy based, smell great, AND will have a ring inside! The rings are valued from 10-5,000 dollars.
This whole concept reminds me of a grown up cereal box prize! AND I don't have to fight anyone to get to the prize first! Score!
I had been telling my husband and all of Facebook for about a week that I wanted one. My husband, being the amazing man he is, bought one for me and had it sitting on the table for me when I got home one day. I lit that puppy right away. The scent was fresh cut grass and it smells delicious...although it smells more like apples than grass. This company not only struck gold with their concept, but have created candles that rival popular brands(in my opinion at least). And let me mention again that these are soy based! I know so many woman in my life who would love to get one as a gift(hint to all the hubbies out there!)
I do have to say, it was hard to wait for the magic gold foil to appear. I felt like I a 5 year old again, with the level of anticipation of waiting for Santa to come. I am thankful that the ring is near the top of the candle...otherwise, I would probably be digging the wax apart to get to the ring and would have to use a candle warmer later to enjoy the candle!
I was also so happy with the ring that I found inside! I just ordered two more (through a special online deal on nomorerack.com) and cannot wait for the next one!
Wednesday, September 5, 2012
Headband Holder
I am super excited for how this turned out! What a cute way to organize headbands and hair clips! This is one I made to list for sale on my Facebook page...I am going to have to get ribbon to match my bathroom and make one for myself!
What do you guys think about the project?
Tuesday, August 28, 2012
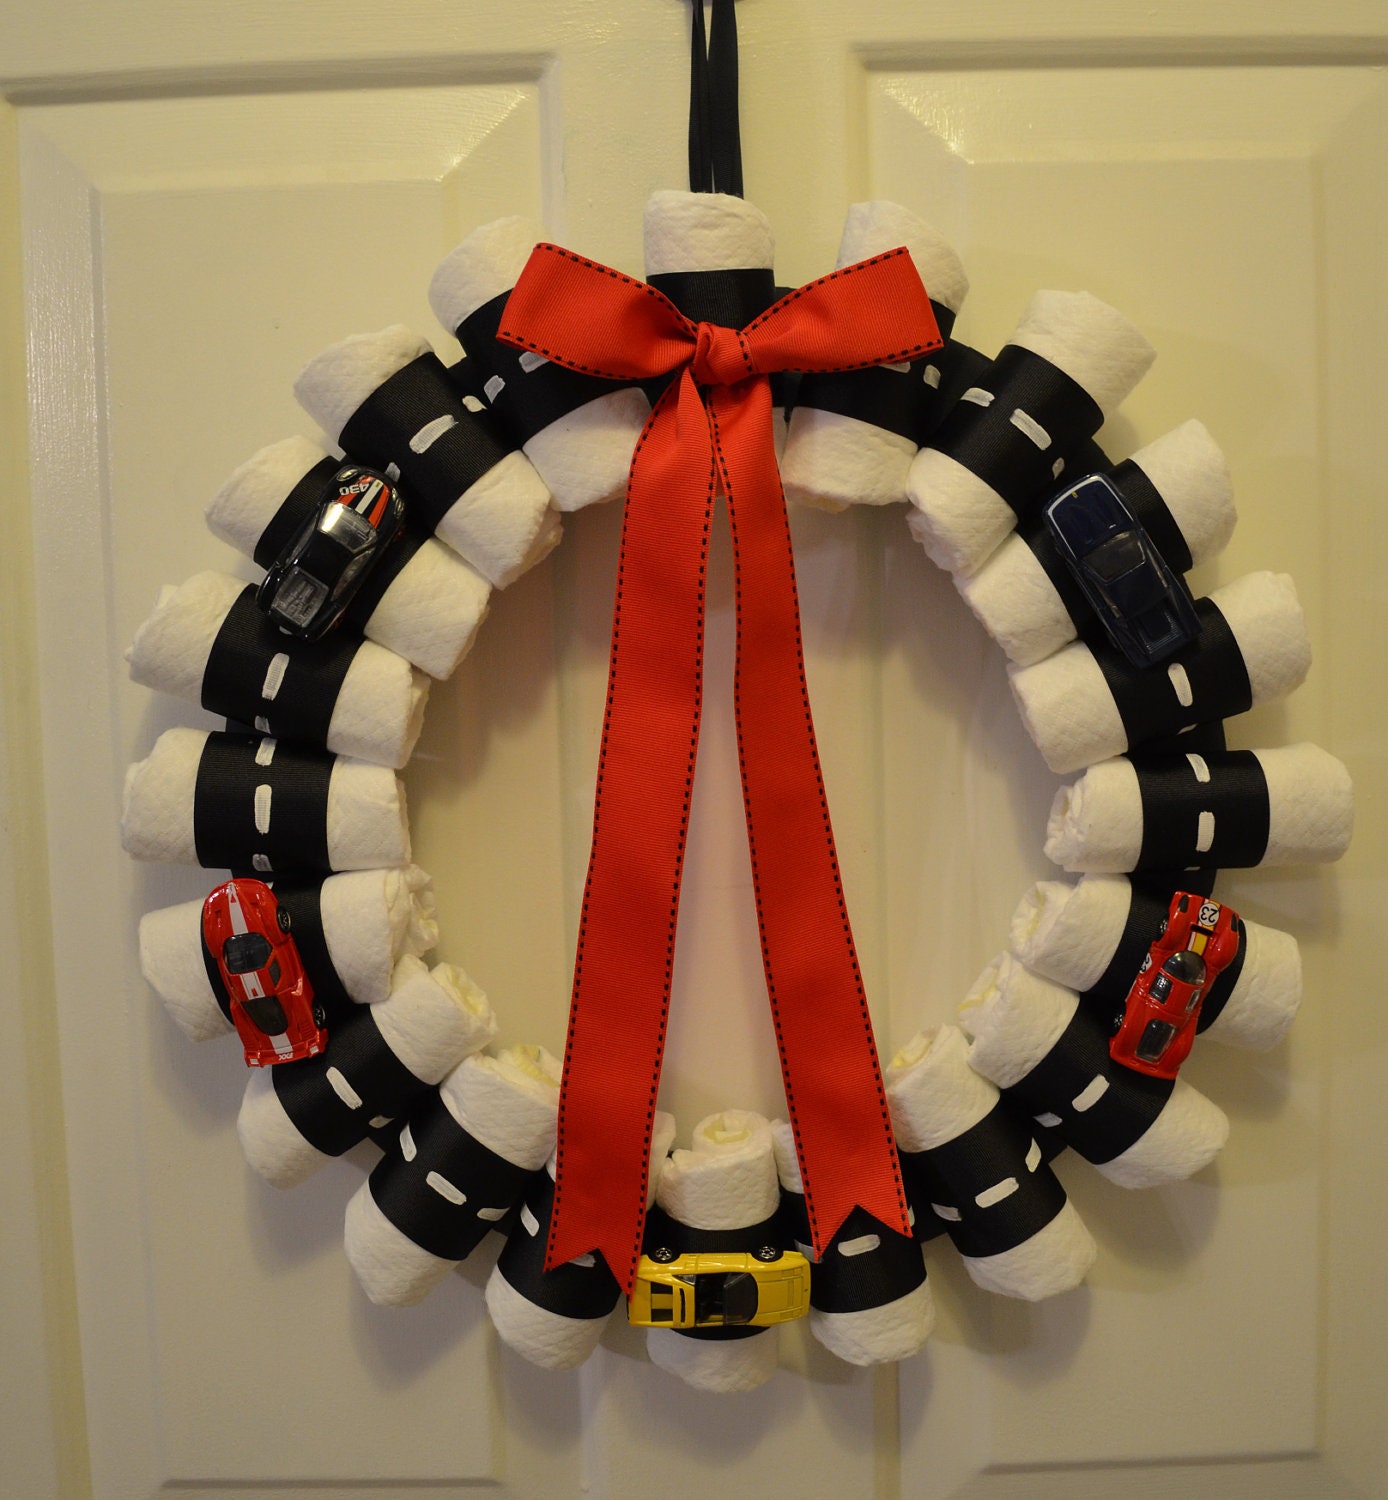
Diaper wreath that the boys will love!
This diaper wreath would be a great gift for a mom expecting a baby boy! It can also be ordered using larger sized diapers as a first birthday gift!
Check it out on my etsy page! Custom orders available for any colors or themes :)
http://www.etsy.com/shop/TheatreKris
If it isn't listed on my etsy page, please comment me here and I can relist it or you can request a custom order on etsy :)
Check it out on my etsy page! Custom orders available for any colors or themes :)
http://www.etsy.com/shop/TheatreKris
If it isn't listed on my etsy page, please comment me here and I can relist it or you can request a custom order on etsy :)
Labels:
baby boy,
baby shower,
baby shower gift for boys,
baby shower gift ideas,
baby shower ideas,
boy baby shower ideas,
car diaper wreath,
cars,
Diaper wreath,
diaper wreath for boys,
hot wheels
Tuesday, August 14, 2012
Think Outside the Diaper Cake!
Think outside the diaper cake and get a diaper wreath instead!
My friend and I had joked in college about getting pregnant at the same time and having a preggo club (matching jackets and all). While we didn't end up getting jackets made up, we did manage to get pregnant within about 4 months of each other. It was fun knowing that we would be going through the whole pregnancy and baby thing around the same time. I had my son in May and was expecting to meet her little girl in September.
Babies have their own idea of how things should work, and Little Lady decided to make an early apperance at only 32 weeks! Her mommy and daddy were surprised by her early debut, but were so excited to meet their healthy baby girl. Little Lady is an absolute rock star. She was off of oxygen the day she was born, was maintaining her body temperature a day later, and within about a week she was drinking from a bottle. Her doctors had originally said she would be in the NICU for about a month but this little lady likes to do her own thing, and will be going home tomorrow after only a week and a half in the hospital. When I had found out my friend was pregnant, I had messaged her sister right away and had told her I wanted to help out with the shower. I began pinning ideas right away for all of the cool things I could make for the party. One idea that caught my eye right away was a diaper wreath.
My friend had told me before she even got pregnant that she wanted to have a Ravens themed diaper cake for her shower. Well, I decided to do a wreath instead of a cake...and I didn't go with the whole football theme either. She will forgive me though because she appreciates having something different than her other friends have had.
When Little Lady decided to come on her own time, we were all left wondering if the shower would still be on for the same date. Her parents talked it over and decided that they would keep it scheduled, because they are in obvious need of all those baby items off of their registery. Little Lady will be home just 3 days before her shower and I am sure my friend cannot wait to organize all the baby stuff she will be getting from the shower! I wonder if you can have nesting instincts after the baby is born?
Anyways, I finished the diaper wreath today(after a week of working on it...my little guy has kept me busy!). I also decided to start selling custom made diaper wreaths locally using Facebook and will also be showing off some of my other crafts for sale there as well! I had a change of plans job wise and have more free time now during this school year. More on that later though.
Wednesday, July 18, 2012
DIY Window Clings!
Back in the day, I had a crazy looking bedroom. Each wall was a different, bright color. I had muslin fabric for curtains that I used fabric paint on and also had glued buttons and small objects too. I had Aol CDs hung up in a design on my one wall, using the shiny side facing outwards of course. I had artwork I had made as well as things I had clipped out of magazines hung up on the other walls. My furniture was painted in funky colors and designs. It was totally and without a doubt, created by an 8th grader.
One place in my room that I spent a lot of time in front of was the mirror on the back of my door. I used it to figure out the whole makeup thing, rock out to music, and make sure I looked cute in what I had picked out for the day. Like everything else in my room, I couldn't just let it be and I had to decorate it somehow; This is how I accidentally discovered that fabric paint could be used to make window clings.
You can take fabric paint and paint directly onto the glass surface. When the paint dries, it stays stuck to the glass, but can be peeled off later. I had my "clings" on my mirror for about 3 years and was still able to remove them easily and without damage to the glass.
I thought I would share this trick. What a great craft for the kids to do in their bedrooms or on your windows for the holidays! If anyone tries it out, I would love to see what you come up with!
Tuesday, July 10, 2012
iPad in the kitchen solution
Since my other post today was just a quick share, I thought I would post this too.
I often find myself using my IPad in the kitchen. I have so many yummy recipes saved on Pinterest and I usually just bring my iPad in with me when I cook. I know I can't be along in using my iPad as a cookbook. I also can't be alone in hating the idea of it sitting on the counter as I pour water and crack eggs right next to it.
I found this cute cookbook holder from Homegoods for only ten dollars! Not only does it work great in the kitchen, but I can also use it as a place to sit my iPad on a shelf or table when not in use! So if you like to use your iPad for cooking, or just want a cute stand to store yours on, I suggest investing in an easel or cookbook holder too!
Rainbow Painting
This is my absolute favorite thing that I have ever created. I made it about 4 years ago. It actually happened by accident. I had created the most amazing door cover for my bedroom in my first apartment. I spent days creating it and It looked awesome. Unfortunately, I did not account for the fact that the paper would be super heavy, and no amount of tape would keep it up! I put it in my closet until I could figure out what to do with it. A few months later I pulled it back out and decided that I would glue it down to a canvas. I am not quite ready to share how I made it. I haven't seen anything else like it and with the dimension it has. Maybe if I get enough interest I will give a tutorial though.
I have thought about listing it on Etsy, but honestly I just love it too much to ever part with I think! What do you guys think about it? If I do ever list, how much should I list for?
Monday, July 9, 2012
Kitchen Spices
Anyone else hate the plastic containers that the spices come in? Sure, you can buy yourself a nice spice rack that comes with the cute glass jars, but what about that special steak seasoning you bought that doesn't have a home on that rack? That ends up sitting in its original container and it just ain't pretty!
A few years ago I went to a bridal shower. The hostess was an interior designer and had a beautiful home. I especially loved the hutch she had in her kitchen. All of her spices and baking supplies were in glass jars and displayed. It's amazing how much you can appreciate your spices when you can actually see how colorful and different each one is! I knew that one day I wanted to recreate that storage system as best I could and I finally took on that project a few months ago.
I work on a budget, so my jars were not high end like her jars were. I purchased the small spice jars from Tuesday Morning for .99 cents each. I had to go to 3 or 4 stores to collect how many I needed, as well as a few extra for any new spices I add later. I bought the larger jars from Ikea for about 5 or 6 dollars apiece. It was more than I normally spend overall on a project, but well worth it.
I bought labels from Office Depot and hand wrote the name of each spice. I liked the DIY look of the labels over printing them out.
I also bought a few small ceramic spoons from Crate and Barrel. They work perfectly to scoop out the spices. I do want to buy one or two metal scoops from there too for the flour, sugar, and other baking ingredients.
My husband and I just love how it turned out and we find ourselves using spices we had overlooked before. We have also received so many compliments from guests.
What is your current storage system for your cooking and baking needs? If you have anything creative I would love to see!
Labels:
baking,
cooking,
decor,
glass jar,
home decor,
hutch,
ikea,
jar,
jars,
kitchen,
kitchen storage,
spice rack,
spice storage,
spices,
storage,
tuesday morning
Dessert Stand
This project only cost $3 to make! I found the glass top for $1 at a yard sale. I had been wanting to make a dessert stand for awhile now, but didn't have a cover. I was so excited when I found it sitting in a box because I could finally start this project! The plate was on clearance for .99 cents at The Christmas Tree Shop and the candlestick holder was from Dollar Tree for a buck. I already had the spray paint left over from some of the boxes I had made for my last craft show.
This project was really so simple to do. I had to scrub the cover down because it was so dirty from sitting for so long in a garage. Then, I did 3 coats of spray paint on the candlestick holder. Finally, I glued the plate to the candlestick holder. Easy-peasy!
This will be perfect for the party my friend and I are throwing soon. We are going to have a tasting party, which is a party where your guests get to hang out and sample small portions of yummy food. Our guests will have to bring an interesting wine for everyone to sample. We are asking for interesting wines, because a chocolate wine is going to obviously be way more fun than trying, say, Pinot Grigio. We are also going to buy different cheeses from Wegmans and will create a whole bunch of finger foods and tiny desserts! I also want to buy caviar because I think this party will be the perfect excuse to try it.
I am not sure exactly what will be displayed on my dessert stand, but I bet it will look great
Labels:
cake,
cake stand,
cake tray,
dessert,
dessert stand,
dessert tray,
DIY,
spray paint projects,
tasting party,
upcycled
Filing Cabinet Makeover
I love, love, love the cute filing cabinet makeovers found all over the Pinterest craft boards! This is the one I especially fell for...
http://www.littlehouseinthebigd.com/2012/03/spring-time-storage.html
Super cute, super easy, and inexpensive too. What's not to love?
I scoured Craigslist for about a week until I found a metal filing cabinet close enough to my house to make the trip for. I paid $15 dollars for it. I went to Hobby Lobby to find the spray paint, which was on sale for 40% off. Score! I bought 1 can of primer and 2 cans in the color I wanted. I already had fabric to use from there that was originally destined for another project that I decided not to do. The original Pinterest inspiration used scrapbook paper, so if you choose to do this project just know that either is fine to use. I have a Cricut cover in the same pattern and had decorated a waste basket for my office using it as well. I really need to use a coordinating pattern for some curtains I think but that's a whole other project though!
So my materials for this project are...
1 can primer
2 cans spray paint
1 jar of Modge Podge
Fabric
Metal filing cabinet that is in need of a makeover
I wiped down the filing cabinet with my homemade lemon vinegar cleaner first. If the filing cabinet had been scratched at all, it would have required a good sanding first. Luckily, it was in good condition and I could skip that step. I removed the drawers and pulled the rest of the cabinet outside to prime. Since I was covering the drawers with fabric, there wasn't a need to paint them. It was 92 degrees outside today and the paint was drying almost instantly. The spray paint clearly states that the best conditions to paint is between 50-90 degrees. I like to live on the wild side though and decided to ignore the paint can warnings.
It took two coats of the primer to really cover the black enough to move on to the colored spray paint. Here is the cabinet after one coat of the primer. It had better paint coverage after the second coat, but I forgot to snap a picture after the second coat so you will have to use your imagination here for how it looked after that last coat.
The color spray paint I used was called Bauhaus Gold by Krylon. My office is colorful and this should work nicely with everything in there. Here is the cabinet after it's first coat. Fun and sunny right?
It took 4 coats to finish, which was exactly what my two cans of paint had in them.
Next step in the filing cabinet makeover was to Modge Podge my fabric to the drawers. The Hubby removed the hardware from the drawer fronts. I did two coats over top of the fabric, allowing a few hours between each coat so I was sure it was dry.
We reattached the hardware and my filing cabinet was looking better than it ever had before! I will admit, I had been worried that the drawers would stick because of the Modge Podge, but they work just as well as before.
Ahhh! It is so cute right?
Labels:
DIY,
Filing cabinet,
makeover,
Pinterespie office,
storage,
upcycled
Subscribe to:
Posts (Atom)