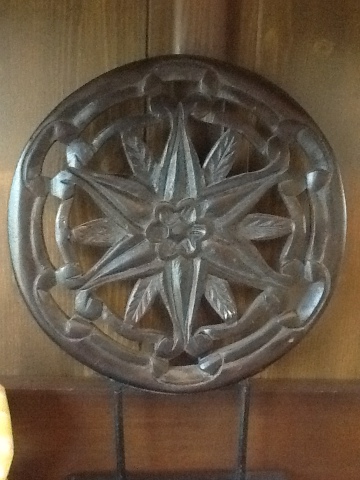
When we moved into the house, the sellers left behind a few things (we told them they could). One of the things they left behind, was a wooden shelf that was above the kitchen window. I liked the idea of having a shelf there, but was not really digging the country looking heart in the center of it.
We have been in the house for a little over three years and I am finally getting around to doing something with the shelf. I personally would rather use what I have and upcycled it a bit, than buy something new. It saves money, and I know that the item isn't sitting in a landfill somewhere or stuck eternally on a thrift store shelf. I knew that I wanted something that mimicked the style of the other wall decor found around our downstairs.
I had the hardest time figuring out what to put over the heart. I didn't want a clock; I am too lazy to change the batteries and time(I am the person who doesn't change the clock in her car. I figure in a few months it will be the right time again). I though about maybe a decorative tile, but I couldn't find the right size or style. I finally found a cute, wooden appliqué...but it was too small. I returned it and bought it again during my trip back to the craft store. I decided to buy an oval wooden plaque and layer it with the wooden appliqué. I was so glad that the shape and size was finally just what I was looking for!
I glued the appliqué to the wooden oval, then painted and distressed it. I sanded down and painted the shelf and also distressed the edges some. I glued the oval over the heart with hot glue and popped the shelf right back onto the wall. The whole project took just a few hours.
I love how the shelf looks! I do have some toying around to do with vase arrangement on the top. I bought most of the vases at the dollar store and craft store. The cost for each one was between .50 and $1.50. The green one was $7 at TJ Max. To make each one unique, I wrapped the vases in twine, using hot glue and Modge Podge. I added ribbon or embellishments to add a bit of color and style.
As much as I love the shelf, it makes me want to refinish our builder grade cabinets. We want to extend our kitchen out a bit and need to find some matching cabinets so we can refinish what we have, instead of spending thousands of dollars on new cabinets. We have to wait until the size and model cabinets show up on Craigslist, Freecycle, or in the Habitat for Humanity store.
Showing posts with label upcycled. Show all posts
Saturday, February 9, 2013
Monday, July 9, 2012
Dessert Stand
This project only cost $3 to make! I found the glass top for $1 at a yard sale. I had been wanting to make a dessert stand for awhile now, but didn't have a cover. I was so excited when I found it sitting in a box because I could finally start this project! The plate was on clearance for .99 cents at The Christmas Tree Shop and the candlestick holder was from Dollar Tree for a buck. I already had the spray paint left over from some of the boxes I had made for my last craft show.

This project was really so simple to do. I had to scrub the cover down because it was so dirty from sitting for so long in a garage. Then, I did 3 coats of spray paint on the candlestick holder. Finally, I glued the plate to the candlestick holder. Easy-peasy!
This will be perfect for the party my friend and I are throwing soon. We are going to have a tasting party, which is a party where your guests get to hang out and sample small portions of yummy food. Our guests will have to bring an interesting wine for everyone to sample. We are asking for interesting wines, because a chocolate wine is going to obviously be way more fun than trying, say, Pinot Grigio. We are also going to buy different cheeses from Wegmans and will create a whole bunch of finger foods and tiny desserts! I also want to buy caviar because I think this party will be the perfect excuse to try it.

I am not sure exactly what will be displayed on my dessert stand, but I bet it will look great
Labels:
cake,
cake stand,
cake tray,
dessert,
dessert stand,
dessert tray,
DIY,
spray paint projects,
tasting party,
upcycled
Filing Cabinet Makeover
I love, love, love the cute filing cabinet makeovers found all over the Pinterest craft boards! This is the one I especially fell for...

http://www.littlehouseinthebigd.com/2012/03/spring-time-storage.html
Super cute, super easy, and inexpensive too. What's not to love?
I scoured Craigslist for about a week until I found a metal filing cabinet close enough to my house to make the trip for. I paid $15 dollars for it. I went to Hobby Lobby to find the spray paint, which was on sale for 40% off. Score! I bought 1 can of primer and 2 cans in the color I wanted. I already had fabric to use from there that was originally destined for another project that I decided not to do. The original Pinterest inspiration used scrapbook paper, so if you choose to do this project just know that either is fine to use. I have a Cricut cover in the same pattern and had decorated a waste basket for my office using it as well. I really need to use a coordinating pattern for some curtains I think but that's a whole other project though!
So my materials for this project are...
1 can primer
2 cans spray paint
1 jar of Modge Podge
Fabric
Metal filing cabinet that is in need of a makeover

I wiped down the filing cabinet with my homemade lemon vinegar cleaner first. If the filing cabinet had been scratched at all, it would have required a good sanding first. Luckily, it was in good condition and I could skip that step. I removed the drawers and pulled the rest of the cabinet outside to prime. Since I was covering the drawers with fabric, there wasn't a need to paint them. It was 92 degrees outside today and the paint was drying almost instantly. The spray paint clearly states that the best conditions to paint is between 50-90 degrees. I like to live on the wild side though and decided to ignore the paint can warnings.
It took two coats of the primer to really cover the black enough to move on to the colored spray paint. Here is the cabinet after one coat of the primer. It had better paint coverage after the second coat, but I forgot to snap a picture after the second coat so you will have to use your imagination here for how it looked after that last coat.
The color spray paint I used was called Bauhaus Gold by Krylon. My office is colorful and this should work nicely with everything in there. Here is the cabinet after it's first coat. Fun and sunny right?
It took 4 coats to finish, which was exactly what my two cans of paint had in them.
Next step in the filing cabinet makeover was to Modge Podge my fabric to the drawers. The Hubby removed the hardware from the drawer fronts. I did two coats over top of the fabric, allowing a few hours between each coat so I was sure it was dry.

We reattached the hardware and my filing cabinet was looking better than it ever had before! I will admit, I had been worried that the drawers would stick because of the Modge Podge, but they work just as well as before.

Ahhh! It is so cute right?
Labels:
DIY,
Filing cabinet,
makeover,
Pinterespie office,
storage,
upcycled
Subscribe to:
Posts (Atom)